Hi Everyone
L Zone includes article to learn something, love something or laugh something.
The first article is in learning section and is all about Favicon.
Favicon
stands for Favorite Icon.
Other Name:
Shortcut icon, Website icon, URL icon, Bookmark icon, Page icon.
What is favicon?
It is a small graphic icon file associated with a webpage or website. This
is a square sized image that we see beside the URI address bar.
Don't understand!
Just have a look at image below.
A small graphic icon (may be a logo, symbol,
flag, image etc.) looks small in size but it express thousands of word. So
generally we should create an image that reflects heart and soul of a company
or organization and use it as favicon. Earlier some browsers were supporting
favicon feature and many website were not having any feature to support favicon.
But nowadays nearly all browser supports the feature to display a small graphic
image or icon for a web page in web browser. And many websites has their own
favicon.
Why
favicon?
Icons or small image can attract guests more easily rather than a text. In
general when we see some link in bookmark list, our eye first look at icon and
then on the text beside it.
It can help in distinguishing a website from other websites in terms of look
and feel, symbol (logo) or icon. It can also acts as one of the identity of a
website.
An icon or image expresses thousands of word. Sometimes a favicon can also be
treated as trademark of a website.
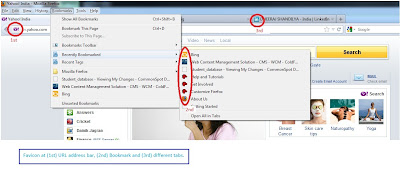
Where
favicon is displayed:
Favicons are displayed in the browser's URL address bar, beside the site's name
in bookmarks list, and beside the page's title in a tab in any browser that
support feature to display favicon.
Size of
favicon:
Size of a favicon can be anyone among 16X16, 32X32, 48X48, 64X64 pixels but
16X16 is preferred and supported by maximum web browser.
File format
that favicon supports:
We
can use different format of image like .png, .gif, .jpeg, .apng etc. to create
a favicon but finally we should convert our image in .ico format so that all
browser can recognize this type of file rather than different format.
Why Ico file formats?
ICO file is a collection
of one or more small images of same or different size and color depths so that
wherever and whenever required the icon of particular size and at particular
color depth can be displayed on web browser. It means when any web page is loaded
the icon file is scanned for the size of image, color depth, computer’s color
capability and some other things. If favorable condition is not found then
image can be compressed or expanded and color can be changed before displaying
the icon on web page.
How to create a favicon?
1.) The first thing that we should have to create
a favicon file is an image or design. Image that reflects the meaning of our website
(or anything that we want to reflect with that image).
2.) We can
create an image or design by using one or more image editor say Paint,
Photoshop, Picasa etc. Once the image is created we have to resize it in 16X16 pixels
and then save it in .ico format i.e. favicon.ico etc.
3.) We can
also create a favicon online. Some websites address are mentioned below:
How to upload a favicon to
website?
Now its time to add favicon to our website.
First approach:
This approach is preferred by W3C for uploading a favicon to a website.
In this method we use a ‘rel’ attribute with Link element and insert the
following code in head section of html code.
<link rel="icon(or shortcut icon)"
type="image/icon(type of
image like png,icon etc. Image of same format should be used in href)"
href= “http://www.testingfavicon.com(Location of favicon)/dhe.ico(Name of the favicon image)" />
For
example:
Example 1)
I have created an image fa.png and saved it at my desktop.

<html>
<head>
<link rel = "icon"
type = "image/png"
href = "file:///C:/Users/Dheeraj/Desktop/fa.png">
</head>
<body>
You are intelligent.
</body>
</html>
Example
2)
I have created an image favicon.ico and saved it in a folder named ‘Final Favicon’ at my desktop.

<html>
<head>
<link rel = "shortcut icon"
type = "image/x-icon"
href = "file:///C:/Users/Dheeraj/Desktop/Final Favicon/favicon.ico">
</head>
<body>
You are intelligent.
</body>
</html>
Second approach:
In this method we upload the favicon.ico file to the root directory of our
website. Once uploaded we can go to http://websitename/favicon.ico.
to check that your favicon is present. Note : If you have not uploaded the
favicon.ico file in root directory then give the right path in URI. This
approach works because some browser uses URI to identify the favicon image. But
it has some limitation. Like if a person has its own website but do not have
its own domain name. Then it is not possible (or
difficult) for him to place the favicon.ico file in
root directory of his website. In such situation they can use first approach.
If we have created our website
using any CMS (Content Management System) like WordPress, Joomla, Drupal, Frog
CMS or Blogspot. Then we have to follow the steps provided by corresponding
CMS. For example I am showing here how to upload a favicon in Blogspot.
Step 1)
Open google page in any browser.
Screen: Taskbar.
Step 2) Click 'More' link and select
'Blogger' list item.
Screen: Google page.
Step 3)
Type in some value in Email and Password field and click on ‘Sign in’ button.
Screen: Blogger, Create your free
blog.
Step 4)
Click on ‘More options’ in Blogger dashboard and select ‘layout’ from dropdown
list.
Screen: Blogger dashboard.
Step 5) Click on ‘Edit’ button in
favicon field.
Screen: Blogger, first
blog – Layout.
Step 6)
Click on Browse, upload a favicon file having .ico format and then click on
Save button.
Screen : Configure Favicon.
Step 7) Click
on ‘Save Arrangement’ button and then on ‘View blog’ button in Blogger
dashboard.
Screen: Blogger, first blog-layout.
Step 8)
Notice that the favicon is applied to your website.
Reference
:
and the
most important one
==================================================================
I hope it helps
Is
there anything missing? or you want to add/ask something, in such case please
feel free to use comments form below.


